On the treatment console (where the 4D Integrated Treatment software runs during patient treatments), the stand-alone software "AM (Acquisition Module) Maintenance" can be used to acquire images and to calibrate the detector (basic image calibration and dosimetry calibration). The necessary steps to prepare the system for dose measurements are as follows:
1.) In Eclipse, determine the MU to deliver 2 Gy isocentrically in a depth of 8 mm (SSD = 99.2 cm) for a 10x10 cm field and each required energy. For this, it is convenient to create a phantom image and fill it with 0 HU (=water). In our system, 214 MU @ 6 MV and 251 MU @ 15 MV are determined. The actual MU depend on beam data: since 8 mm depth is in the buildup region, the shape of the deph dose curve has some influence. We use beam data measured with a high resolution dosimetry diode.
2.) Prepare (or measure) a half-sided diagonal profile for the largest field size of the linac (usually 40x40 cm). SSD should be 100 cm. The measurement depth in water should ideally be 8mm, but dmax may also be used (no significant difference in shape). This profile can usually be taken from the TPS (Eclipse or CadPlan) configuration. Important: use constant step size (e.g., 2.5 mm), starting at the central axis and going out radially. File has to be in W2CAD format.
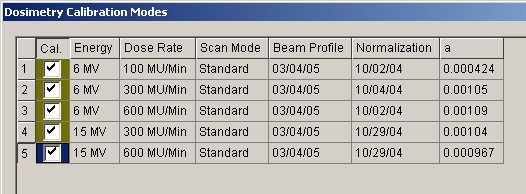
3.) Basic image calibration of the aS500 detector: for all required acquisition modes, perform a basic calibration (dark field, flood field) first. We clinically use the acquisition modes 6X/DR100/300/600 and 15X/DR300/600. These modes should also be calibrated for dose measurements.
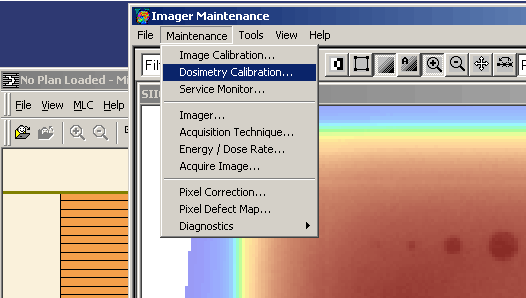
4.) Dosimetric calibration of detector: in AM-Maintenance, go to "Dosimetry Calibration" in the Menu.
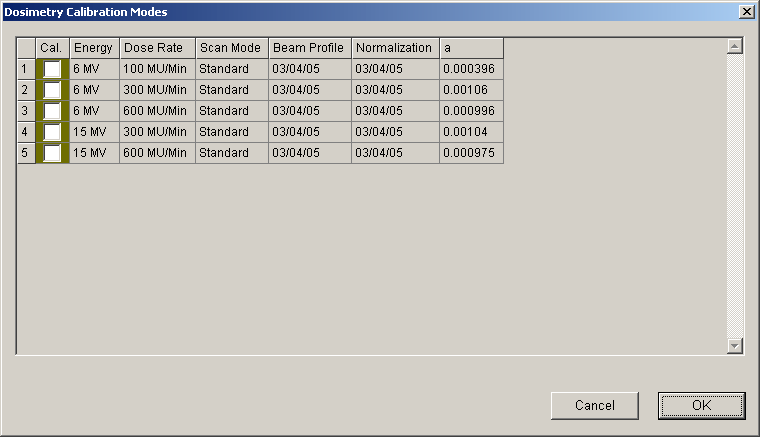
Select the acquisition modes that shall be calibrated. (The rightmost columns are empty if the imager has never be calibrated to dose before).
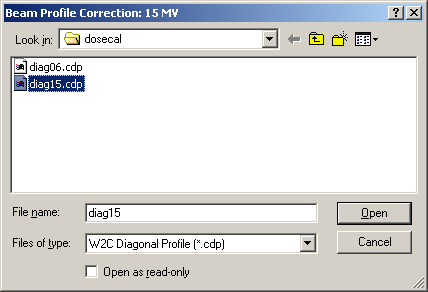
Check the "Profile Correction" box and specify the path to the W2CAD half-sided diagonal profile (one file for each energy).

Place the detector at 140 cm from focus. This is the distance we are using in the Poor Man's Approach to Portal Dosimetry, in contrast to the 105 cm when using Varian's Portal Dosimetry system.
Set up a 10x10 cm field. Program the linac with the MU determined in step 1 (I assume that the linac is calibrated correctly - that the MU of step 1 will really give 2.0 Gy on the day of calibration).
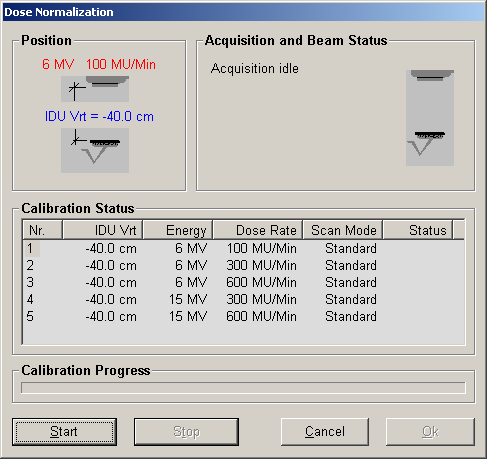
In the software, press start, count to three, then beam-on. Counting to three is important - the acquisition system has some time delay, so if you beam-on too early, you could miss some dose.
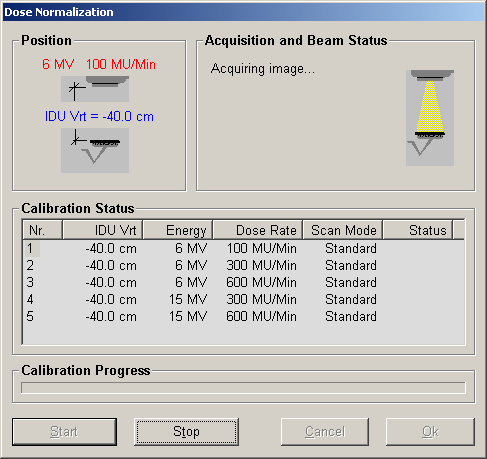
When beam is off, the software asks for some value (they avoid the term "dose"). Enter 2.0, meaning 2.0 Gy. Repeat for all acquisition modes needed.

The dosimetric calibration wizard will tell you some a-values at the end (or show updated values, if an older calibration exists). You may record them for future reference. Now the detector is ready for dose measurements!
After doing the dosimetry calibration for the first time, you will notice that all images acquired using the Integrating Mode and the AM-Maintenance software (or the 4D Console) are colored from now on. This is an overlay. When images are acquired clinically using the 4D-console, they will appear white in Vision (at least in our system), but may be adjusted for window/level (it is best to use the automatic window/levelling first).
Images acquired with AM-Maintenance during IMRT pre-treatment plan verification are saved locally (C:\Program Files\Varian\Oncology\AM\Treatment\Images\...) in DICOM format. They can be opened with any software that is able to handle *.DCM files. After dosimetric calibration, the pixel values can be interpreted in terms of "dose". That means: If you deliver a 10x10 cm field a second time and the detector is still at 140 cm, the same number of MU as in step 5 will give a pixel value of 2.0 Gy in the center of the field.